Archive for the ‘Uncategorized’ Category

Dr Young examines Rhinoplasty Cost / Price and how to evaluate this when you consider Nose shaping / Rhino plasty.

Tuesday, August 3rd, 2010

A frequent question that people have is how much does Rhinoplasty / Nose Plastic Surgery (Dr Young of Bellevue near Seattle, WA) costs.  There are some resources for the average cost of Rhinoplasty that range from 4000-10000 for the surgeons fee.  That doesn’t include the costs for the facility and for the anesthesia and anesthesiologist.  The fee for the facility can range from 500-2000.  The fee for the anesthesiologist can range from 200-1000.  So the range for an Rhinoplasty can be from 7000-15000.  We have a surgical facility near us and they charge 650 for the first hour for the anesthesiologist and each additional hour is 300 for each additional hour.  The facility is 1000 for the first hour and each additional hour is 500.  Things that make a difference is if the Rhinoplasty is a revision, if you need implants, the costs of the implants, if rib needs to be harvested (which could significantly add to the cost), if ear cartilage needs to taken, if the rhinoplasty is just for the tip / dorsum / or nostril area.  When you really analyze things, it ultimately comes down to the time it needs to address your particular issues.  Based on this your surgeon and his staff will come up with some pricing for you to consider.  Implants for the bridge of the nose, for sheets can range from 200-400 dollars for each implant.  A revision usually adds 1-2 hours to the procedure and could increase the price by 1-2 thousand dollars.  Ear cartilage requires about 45 minutes to an hour to harvest sometimes less and this could be 500-1000 dollars more.  These are some of the things your plastic surgeon will think about when he comes up with pricing.

It is good to find out what the average price for Rhinoplasty is for your area.  You can do this by going to multiple consultations.  Sometimes you get what you pay for, as they say.  Somewhere in the average might be a good idea, at least do consider someone that is extraordinarily above the others unless there is compelling evidence that you think that person will do the job that justifies the pricing you receive.

Thanks for reading, Dr Young

Dr Young specializes in Facial Plastic and Reconstructive Surgery and is located in Bellevue near Seattle, Washington
How do I prepare for a filler and what kind of post care should I think of after a filler?

Friday, July 23rd, 2010

Fillers (Dr Young from Aesthetic Facial Plastic Surgery, PLLC in Bellevue, WA) are products that are used to volumize your face.  As you age, you lose volume in your face and these fillers replace this volume.  The most common fillers include restylane, radiesse, juvederm, and perlane.  These are the top four products being used.  So what are some of the things you should be thinking about with filler.  Well to begin with you should not be allergic to any of the products including hyaluronic acid, calcium hydroxyapatite, carboxymethocellulose, gram positive bacteria especially streptococcus, lidocaine or amide type local anesthetics, or a history of multiple allergies or severe reactions to certain medications.  I usually tell people to refrain from high dose vitamin E, herbal medications, supplements, fish oils, omega 3’s, anti-inflammatories (naproxen, aleve, ibuprofen, advil, indomethacin, motrin, excedrin, piroxicam, sulindac, etc.), aspirin 2 weeks before and after the procedure included with this list are some obvious ones like warfarin, coumadin, heparin, lovenox, plavix. Here is a more formal list of medications to avoid from our website.  I do this because these elements / medications can cause bleeding and if you avoid these during this time frame you can avoid extra bruising and swelling.  Arnica and bromelein have shown some benefits but are still being studied and are not a standard in treatment for plastic surgeons so I don’t really recommend it.   This pre filler care will help with the post care.  You should discuss during your consultation the risks and benefits of the use of restylane. During the filler you will have some choices for the type of anesthesia you can get for the filler injections. Now most fillers have lidocaine in the preparation to make it more tolerable.  These are the options:

1. Use ice then inject. Can work but by numbing the area with the ice.  With the local in the filler, you may feel it go in initially with each stick in any new area. But subsequent injections will be more numb with the anesthesia in the filler itself

2. Use topical anesthesia first and then inject.  This is a good option.  The topical makes the skin numb, you may feel the injection go into the deeper layers. But like ice, it will feel like a stick in the new area and then get better with subsequent injections.

3. Local anesthesia and regional anesthesia, so called “dental blocks” to numb the nerves that innervate specific regions.  This is the best way to make it so that you don’t feel anything.  For some it is over doing the anesthesia.  Sometimes, people who get anxious can get reactions to the local anesthesia and you can get an anxiety situation where your heart rate goes up as well as your blood pressure.  This happens about 1 out of 25o times a filler gets done with local / regional anesthesia.

After the filler, you should ice the area especially for the first 48 hours.  I usually suggest 10 minutes for every hour.  I also stress that you should not have the ice directly on the skin but have a barrier to prevent damage to your skin.  This icing will keep the swelling down and also the bruising to a degree.

For the first two weeks, I usually suggest people to massage the area of the filler if there are certain areas that are more elevated and pronounced than the other areas.  Most of this uneveness if it is present will be improved with this.  When the filler is in the lower eyelid area, you need to pull down the swelling over the bone and then massage it from there to effect it.  After the first two weeks, I then suggest to consider more massage if the elevations are subtle and if large then you can consider enzyme injections or hyaluronidase injections which are very potent in reducing unwanted swelling from filler.  Now with radiesse there is no enzyme that will do the same and you have to just massage the area to make it go down to a point that you like.

If you have any questions you can always email me or ask me through this blog

Thanks for reading, Dr Young

Dr Young specializes in Facial Plastic and Reconstructive Surgery and is located in Bellevue near Seattle, Washington

Cleaning your incisions after any procedure that requires suturing.

Friday, July 16th, 2010

This is a blog to discuss how to clean your incisions after any surgical procedure. The key for healing is to remove all crusting and to start with an incision that has the skin edges as close as possible together. The crusting is important to remove because the crusts can be nourishment for bacteria that can proliferate and cause more scarring. I usually suggest to my patients that they use vinegar and distilled water in a 1:3 dilution to clean the incisions. I tell people to do this twice a day. The goal is to get there incision to look like a fine wrinkle. If they keep doing this during the first 2 weeks the incision has the potential to heal incredibly. Always have vaseline over the incisions. It has been scientifically shown that skin cells grow faster when they have two surfaces to grow on. The vaseline serves as the other surface and this promotes the healing. You want the skin cells to grow over the incision as fast as possible. This reduces the scarring. Some people advocate hydrogen peroxide. I would caution that the use of this can be risky. I use the same dilution with hydrogen peroxide and distilled water in a 1:3 dilution. The key with the use of hydrogen peroxide if you are going to take the risk is to use it sparingly. You just want to use it to take the crusting off and then stop. If you do this more than that you can have more scarring. So being conservative is very important. If in doubt don’t use the hydrogen peroxide. And if you do use it, do so for only the first week and that is it. You should continue to clean your incision for about the first two weeks and keep vaseline on the incision at all times. After this you can do regular skin care and use sunscreen during the day (approximately 12 hours) and then silicone gel during the evening for 12 hours. The silicone gel can be found at any pharmacy or drugstore, like Bartells. I would do the silicone gel for the next 3 months. It is one of the only things that have statistically shown to make a difference in preventing scarring. Vitamin E, aloe vera, mederma based on my knowledge and recent literature search (05 / 2010) does not make a scientific difference. Following up with your doctor is really important to do so that they can make sure that you are on the way to healing the right way!

Thanks for reading, Dr Young

Dr Young specializes in Facial Plastic and Reconstructive Surgery and is located in Bellevue near Seattle, Washington

Is Acne Surgery covered by insurance companies

Monday, June 7th, 2010

For treating acne flares and medical treatment, most insurance companies cover many of these expenses.  When it comes to improving acne scars and the cosmetic portion through Acne Surgery, in my experience, insurance companies generally do not cover these expenses. You should always inquire with the particular insurance companies that you are covered under and their particular policies.  When it comes to active lesions which require some procedures such as incisions and drainages, extractions, and surgically treating active lesions; insurance companies are more likely to treat these.  I usually treat the cosmetic portions that result from Acne which aren’t covered by insurance such as laser treatments, scar excisions, subcision, grafting of skin to scars, etc. Here is a live demonstration video of an Acne Treatment Procedure.

Thanks for reading,

Dr Young

Dr Young specializes in Facial Plastic and Reconstructive Surgery and is located in Bellevue near Seattle, Washington

Custom Chin Implants are a good option for chin augmentation and how much anterior projections should I have.

Saturday, May 15th, 2010

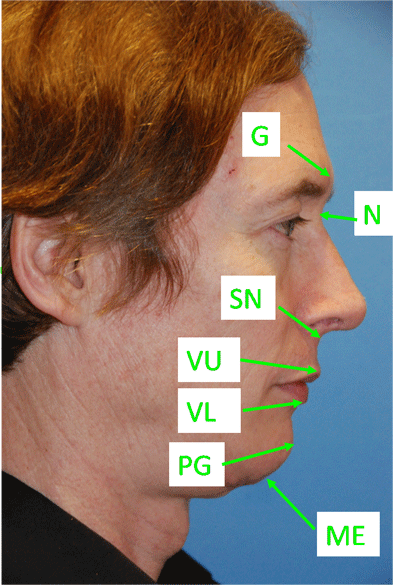
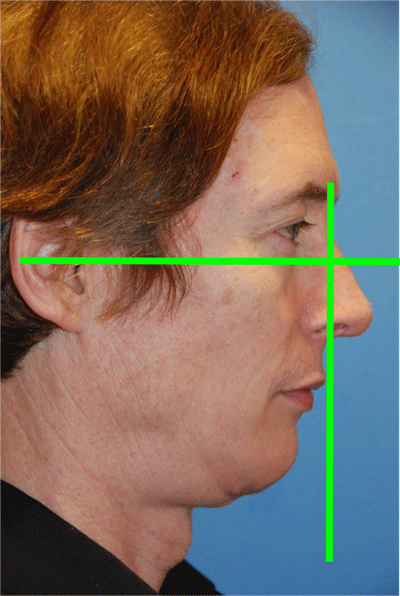
Chin implants (Dr Young specializes in plastic surgery in the Face and Neck in Bellevue Washington) come in many shapes and sizes.  Sometimes, even with the many variations there  might not be one that fits all of your needs.  This is when a custom implant may be the perfect choice for you.  One of the first questions you should ask is whether or not a chin implant would work for you.  There are multiple ways of assessing whether you could benefit from enhancing your chin.  The first thing to do is to understand the various landmarks. In the first picture, the Glabella, labelled “G” is the most projecting point on the lower parto f the forehead and is usually right between the eyebrows. The nasion, labeled “N”, is the most depressed point below G and is usually at the root of the nose.  The Subnasale, labeled “SN”, is the point of transition from the nose to the upper lip.  It is where the nose, columnella, intersects the upper lip.  The upper vermillion is the point of transition from the white part of the upper lip to the red portion of the lip (Called the Vermillion) and is labeled “VU”. The same point coinciding with the lower lip is labeled “VL”. The Pogonion, labeled “PG”, is the point of the chin that is the most projecting anteriorly.  The mentum, labeled “MN”, is the most inferior portion of the chin.  One thing to be careful of is when the patient has a double chin.  The mentum is the part of the chin that is associated with the chin and not the inferior part of the sagging that can occur under the chin and posterior to the chin. One rule was developed by Gonzalez-Ulloa shown in the second picture.  The horizontal line you see will be refered to a lot by surgeons. It is called the frankfort horizontal.  It travels from the top of the ear canal and through the top of the inferior orbital rim.  The vertical line you see is part of there interpretation of where the chin should be.  The vertical line should travel through the Nasion and the the Pogonion should approximate this line. Some feel that the augmentation based on this rule would lead to too much projection. A similar rule places the vertical line of the Gonzalez-Ulloa line more posteriorly at the subnasale, although sometimes it is very close as in this picture, called the Epker and Fish Rule.  Based on this rule, the vertical line should travel from the subnasale and through the upper vermillion “VU” and the lower vermillion should be 2mm behind, and the pogonion should be 4mm behind. The third really common rule is based on the Nasal Chin Lip Line.  It is based on the ideal nasal length measure from the root of the nose at the level between the upper eyelid crease and the upper eyelid margin to the nasal tip.  From the half point distance, a line is drawn through the upper lip vermillion.  From this point, the pogonion should be be 3mm behind this line.  The last two rules are my most preferred ways to assess how much chin augmentation to do.  In another blog, I will address the vertical dimensional analysis.

Thanks for reading, Dr Young

Dr Young specializes in Facial Plastic and Reconstructive Surgery and is located in Bellevue near Seattle, Washington

Profile Landmarks

Nasal Chin Lip Plane / Line

Solution for the wide nose at the level of the nostrils through Alar wedge excisions, nostril sill excisions, VY advancements, and cinching procedures.

Saturday, March 27th, 2010

Have you wondered if you need to have the skin at the sides of your nostrils reduced or what it takes to make your nose less big at the base of your nose at the level of the nostrils through rhinoplasty (Dr Young near Downtown Bellevue, WA).  If you take a look at the first picture. The green arrow shows where the alae, the tissue that covers the nostril, attaches.  If the alae flares (at the blue arrow) greater than 2 mm than a significant amount of alar flare is present and a alar wedge excision would be an appropriate procedure to narrow the base of the nose which is shown in picture 2.  Do you have a wide nasal base in the first place?  Well if your nose at your base is bigger than the distance between your eyes, you could benefit from some modification of your nasal base. As described for the Alar Wedge Excision above.  The third picture shows the Intercanthal width which is the distance between our eyes by the green arrow.  The Yellow arrow shows the interalar width.  If the Interalar width, the distance between the outsides of the alae, are larger than the intercanthal distance (or the distance between the eyes), than you could benefit aesthetically from some form of treatment to make the nose narrower in the nasal base area ( measured by the interalar width).  When you don’t have alar flaring the excessive interalar width, is due to the lateral attachment of the alae (treated by VY advancement or cinching procedures), excessive size of the nostrils (nostril sill excision), or excessive tissue in between the alae (Cinching procedure, or treating the medial crura that makes up the columnella).   First do you have excessive nostril size?  If your nostrils are horizontally oriented and are wider than the width of the columnella a nostril sill excision would be a good consideration to narrow the interalar width.  In the fourth picture, The green bracket shows the width of the columenella while the yellow bracketing shows the width of the nostrils.  The green arrow shows the nostril sill area where the resection for the nostril sill should be in the horizontal portion as seen in the fifth picture. So in the fourth picture if the green bracket of the columnella is less wide than the nostril sill denoted by the yellow bracket, the nostril sill excision could be used to narrow the nasal base. If alar flaring and excessive nostril size are not present and you still have a wide nose as shown by the interalar width, you can then use VY advancements or cinching procedures to narrow the interalar width.

Thanks for reading, Dr Young

Dr Young specializes in Facial Plastic and Reconstructive Surgery and is located in Bellevue near Seattle, Washington

Alar FlaringAlar wedge excisionInteralar Width AnalysisNostril Sill 2Nostril Sill Reduction

Rhinoplasty and the art

Friday, March 19th, 2010

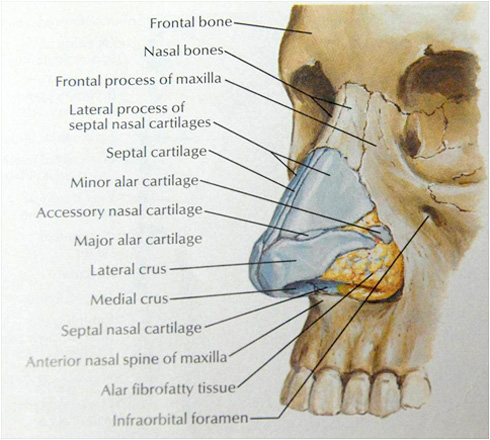
Rhinoplasty (Dr Young Specializes in Facial Plastic Surgery and Rhinoplasties) is one of the hardest procedures that a facial plastic surgeon can do.  There are many steps in doing a Rhinoplasty and the steps you go through and the order is essential.  Many noses have a deviated component to it.  I usually try to make all noses straight first before doing additional work in the middle and lower part of the nose.   If you don’t make the nose straight all of the other moves that you do will further accentuate the deviation.  It starts with your septum.  You have to make sure that the septum is straight first before anything.  Sometimes this requires treating the nasal bones and shifting them to make them more in the middle as well.  Septum with all of these maneuvers the septum still doesn’t become straight. At this point, weakening the septum with 50% inferior cuts until it is allowed to come to the middle is needed.  In addition, sometimes it requires fracturing the septum higher up under the nasal bones to really weaken the septum and allow it to come into the middle.  Sometimes there are forces at the bottom of the septum near the tip that needs to be addressed including removing parts of the septum that are deviated or even shaping the spine that is at the bottom of the nose.  All of these things can be seen in the photo that is at the bottom of this blog.  Once the septum is straight then you can work on other things like the nasal tip, upper lateral cartilages to make the tip look the way you want.  I tend to do all of my rhinoplasties in the open approach and we have a picture of how that heals on our website.  This allows me to more accurately control things in the nose cutting down drastically my revision rate.  I also employ non destructive techniques for the best controlled long term solid results.  I never morselize, or weaken the cartilages to get results.  There is too much variables in healing that can lead to a bad result.  I hardly cut the cartilages and leave them to heal. They are always reconstituted and always done away from the tip area.  Sometimes in thin skin, I will crush cartilage to cover sharp edges on the tip areas or other areas to soften the results.  But the foundation is never crushed or morselized.  My order of rhinoplasty proceeds like this: markings, injections, open approach, address the nasal bridge first, if there is a deviation, treat the nasal bones through osteotomies to make the septum straight,  septal harvesting for grafts preserving 1.5cm of struts for ultimate support, septal restructuring to make sure that it is straight, further work on the nasal bridge, then proceeding to reconstituting the upper lateral cartilages to the septum,  then I start on the tip work including trimming the lateral crural cartilages, tip suturing (columnellar strut, medial crural sutures, transdomal sutures to narrow the tip domes, interdomal sutures to make the whole tip smaller, setting the tip’s projection, controlling the rotation through a tip rotation suture), then closure which includes closing the dead space.  Below is a picture of the anatomy of the nose.  The middle crura is in between the lateral and medial crura.  The middle crura cartilage and the junction with the lateral crura creates the tip highlight and the tip is mainly made up of the middle crura with the lateral and medial contributing to how the middle crura is presented on the nose.  The lateral process of the septal nasal cartilages are otherwise known as the upper lateral cartilages.  The lateral, middle and medial crura make up the lower lateral cartilages.

I hope that was interesting for you!

Thanks for reading, Dr Young

Dr Young specializes in Facial Cosmetic and Reconstructive Surgery and is located in Bellevue near Seattle, WashingtonNasal bones and anatomy

How soon can I fly after a blepharoplasty procedure?

Wednesday, February 10th, 2010

After Blepharoplasty and other significant facial surgery, staying near your doctor for the first weeks is important.  The most important periods when bleeding can occur is usually the first 24 hours where most events (greater than90%) occur.  The second point is 6-7 days later when the clots start to dissolve and there is a period when the blood vessels are unstable.  Sudden bleeding can lead to significant pressure on the eye that might need to be addressed immediately.  Sometimes this pressure can put your vision at risk.  I usually suggest not flying for at least 2 weeks from the procedure.

Thanks for reading, Dr Young

Dr Young specializes in Facial Plastic and Reconstructive Surgery and is located in Bellevue near Seattle, Washington

Epicanthal folds can keep an Asian Blepharoplasty result from realizing its full potential

Tuesday, February 9th, 2010

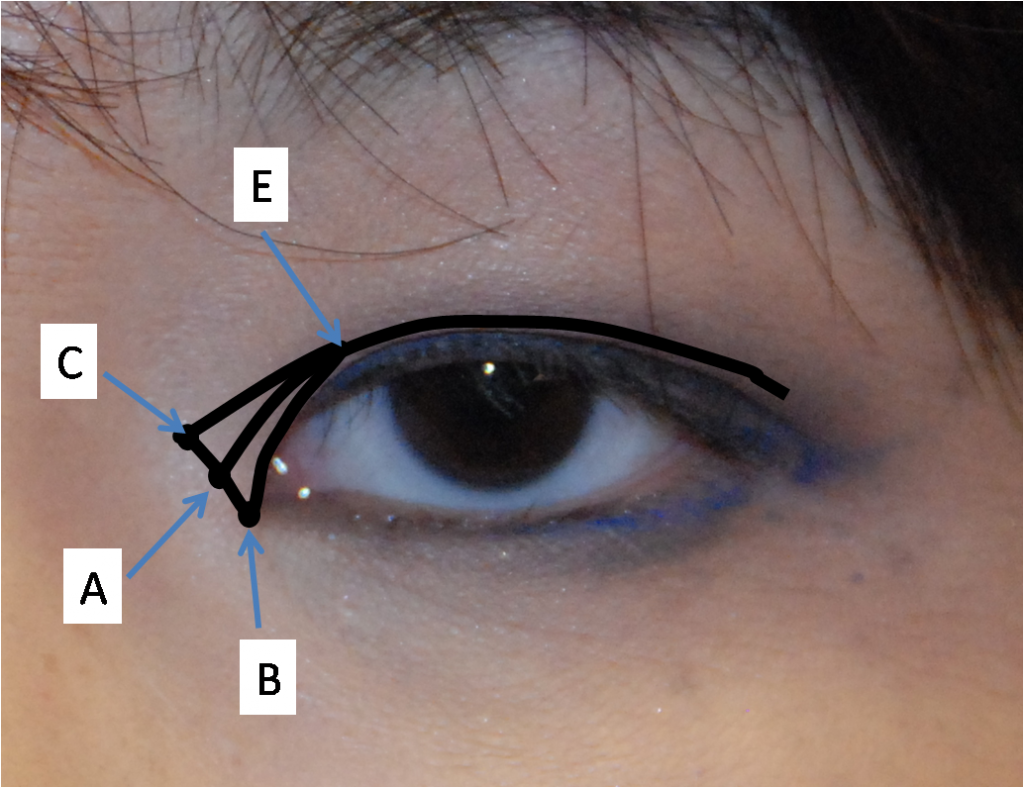
Often times, when you do an Asian Eyelift (Aesthetic Facial Plastic Surgery in Bellevue, WA) you can create tension at the middle part of the eye where the epicanthal fold is located.  When the crease is made higher than lower, the tension that the higher fold creates can place tension on the epicanthal fold and lead to what is commonly referred to as the round eye deformity.  The appearance is an eye that looks round because it has increased its dimension in the superior and inferior direction but has remained the same in the horizontal dimension.  In this case, an epicanthal fold can relieve this tension and create a more pleasing appearance to the eye by reshaping the epicanthal fold. There are four types of epicanthal folds.  Type on is where there is no extra fold of skin that covers the fleshy part of the middle part of the eye called the lacrimal lake.  When the epicanthal fold covers the top part of the fold and partially covers the lacrimal lake like the picture below a type 2 epicanthal fold exists.  When the fold totally covers the fold a type 3 epicanthal fold is present.  When the fold is reversed and is mainly originating from the lower eyelid, a type 4 epicanthal fold is diagnosed.  Below shows a very common way to reshape the epicanthal fold.  Point B is where the epicanthal fold transitions into the lower eyelid. Point A is the medial most point of the lacrimal lake. There is another point on the other side of the epicanthal fold that is called point D coinciding with the surface representation that is Point A.  Point C is the extension of the marking from Point A that meets with the double eyelid crease markings that comes from Point E where the epicanthal fold meets the upper eyelid transition.  Lines AB, BD, and AC are all equal.  Simply put, the triangle EAC is excised and after cutting DBA, the flap DBA is moved to ECA used to be.  The lines BD and AB are sutured together.  Here is video on Asian Blepharoplasty and Medial epicanthoplasty.

Thanks for reading, Dr Young

Dr Young specializes in Facial Plastic and Reconstructive Surgery and is located in Bellevue near Seattle, Washington
park z epicanthoplasty

Pretarsal show and Epicanthal fold are important terms when you do Asian Blepharoplasty

Tuesday, February 9th, 2010

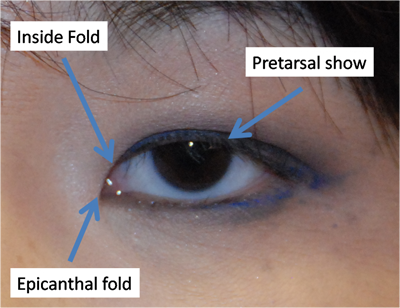
I wanted to talk about the various terms that people are using when they consider Asian Blepharoplasty (Seattle’s Dr Young).  One is Pretarsal show. Essentially this is the height of skin that is exposed under the crease when the eye is opened.  See the picture below.  You measure or assess this when the patient’s eye is open and the height that is measured from the crease to the eyelid margin where the eyelash is located is the height of the pretarsal show when the eyes are open.  This is different from where the crease actually begins which could be, and usually is, much higher underneath the fold of skin that folds over where the crease begins.  When you determine where you put the crease, the amount of skin you take will affect the pretarsal show.  I usually use a metal pointer to stimulate where I will make the crease and have the patient open up there eyes.  At that point, I will ask the patient if the pretarsal show is high enough.  But I usually ask whether the “crease is high enough”. Usually the crease is set between 6 and 8 mm for a small fold.  If the pretarsal show is not high enough after placing the metal pointer at 8 mm I usually then think of taking more skin.  Then depending on how high the patient wants I usually estimate how much higher and then I multiply that by two which determines how much skin I take.

The other question I ask patients is whether they want they crease to end medially with an inside or outside fold. The picture below shows an inside fold.  An outside fold would be end closer to the nose and closer than the fold of skin where the epicanthal fold is located.  The epicanthal fold is just the extra skin that covers the fleshy part of the medial part of the eye (which is called the lacrimal lake).

To maintain you ethnicity, I usually like to make the pretarsal show no higher than 3mm and the medial part of the crease is usually an inside fold.

The epicanthal fold is another area that you can treat.  Through a different techinque you can make the epicanthal fold more open by transposing the tissue of the epicanthus more medially.  This can open up the eye and improve the results of an Asian Blepharoplasty.  I use Dr Park’s Z epicanthoplasty for most of my epicanthoplasty procedures. You can read my other blog on Dr Park’s Z epicanthoplasty that I like to do.  Here is video on Asian Blepharoplasty and Medial epicanthoplasty.

Thanks for reading, Dr Young

Dr Young specializes in Facial Plastic and Reconstructive Surgery and is located in Bellevue near Seattle, Washington
eye anatomy front view